In preparation for SoFoBoMo, I’ve been reading up on different image processing techniques – things that give photos a certain look or style that sets them apart from simply fixing white balance, contrast and saturation. One popular technique is “cross-processing”, which involves processing film in a chemical solution intended for a different type of film – causing drastic shifts in color and contrast. The most common variation of this is processing color negative film in chemicals intended for slide film (C-41 as E-6).
For digital photographers, there are many tutorials online that show how to achieve similar results in Photoshop, mostly using simple curves adjustments.
However, I use Aperture (version 2) to manage my photo collection – and while I love Photoshop, I’d like to do as much as possible in Aperture in order to save on time and hard drive space. So, I set out to recreate the cross-processing technique in Aperture, which is somewhat problematic since it doesn’t have the same curves adjustments as Photoshop. Instead, you can do “levels” adjustments on the red, green and blue channels… but, as I discovered, you have to do quite a bit more tweaking in Aperture to get the same results. So, I created a levels preset in Aperture that results in images that pretty closely match what you’d get from following the aforementioned Photoshop tutorials.
Without going into too much boring detail, I did this by applying only the red channel adjustment to an image in Photoshop – then, with the same image in Aperture, adjusted the red channel levels until it matched what I was seeing in Photoshop. Then I did the same for the green and blue channels individually. Finally, I combined all three channel adjustments and compared the Photoshop version to the Aperture version for some final tweaking to make sure I got it right. Hardly a scientific process, and the match is far from perfect – but I think it’s close enough to be usable – especially considering the fact that the overall look of an image is very subjective anyways.

I’d offer the preset as a download, but there doesn’t appear to be any way to import/export adjustment presets in Aperture… so, I’ll run through the exact steps required to create the preset here:
Step 1
In Aperture, select an image to cross-process and bring up the adjustments panel. You may want to make any necessary exposure adjustments now using the “Exposure” part of the adjustments panel… a badly underexposed image will still look badly underexposed after cross-processing.
Find the “Levels” portion of the adjustment panel. That is what you’ll be working with for this tutorial. If you’ve already made adjustments to the levels, you’ll want to reset them or choose a different image. Near the upper right corner of the Levels pane, is a button that has a rectangle with two vertical dotted lines running through it… click that button to show the “quarter-tone controls”:
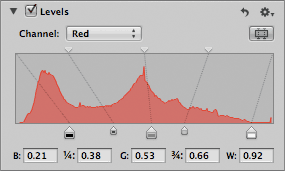
Step 2 – Setting The Red Channel
Select “Red” from the “Channel:” pulldown menu, and do the following steps in the order listed:
- set B: to 0.21
- set W: to 0.92
- set G: to 0.53
- set 1/4: to 0.38
- set 3/4: to 0.66
- at the top of the levels graph, drag the first triangle to the left about 2-3mm (the triangle whose line connects to the 1/4 point)… unfortunately there’s nowhere to enter a numerical value for this adjustment
Now your Red channel should look like this:
Step 3 – Setting The Green Channel
Select “Green” from the “Channel:” pulldown menu, and do the following steps in the order listed:
- set G: to 0.42
- set 1/4: to 0.25
- set 3/4: to 0.63
Your Green channel should look like this:

Step 4 – Setting The Blue Channel
Select “Blue” from the “Channel:” pulldown menu, and do the following steps in the order listed:
- set W: to 0.94
- set 1/4: to 0.21
- set 3/4: to 0.81
Your Blue channel should look like this:

Step 5 – Saving The Preset
In the upper right hand corner of the “Levels” pane, click on the icon that looks like a gear and select “Save as Preset…”. Give your preset a name like “Cross-Process” and click the “OK” button. You now have a Levels adjustment preset you can use on any image – simply by clicking on the gear icon in the Levels pane and choosing “Cross-Process” (or whatever you named it). Your results may vary depending on the image, but it should get you in the ballpark and you can make adjustments as needed from there (the same goes for the Photoshop tutorial cross-processing techniques).
Step 6 – Taking It A Step Further
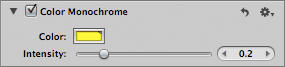
Some of the cross-processing tutorials suggest also adding a color layer to give the image more of a yellow or green tone. While there’s no exact match for doing this in Aperture, you can add a “Color Monochrome” adjustment for a similar effect. Choose something like a pure yellow with RGB values 255, 255, 0 for your color, and move the intensity slider to somewhere in the 0.2 range as shown here:
The difference between Photoshop and Aperture here, is that Aperture applies the adjustment as a color change – rather than simply overlaying the solid color like a “Normal” layer in Photoshop… which means that the effect won’t be as noticeable in dark areas of your image. You can compensate for this some by raising the “Shadows” adjustment in “Highlights & Shadows”.
If you like, also add some vignetting using Aperture 2’s new vignette adjustment.
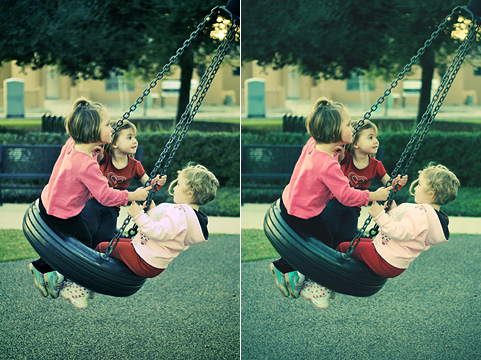
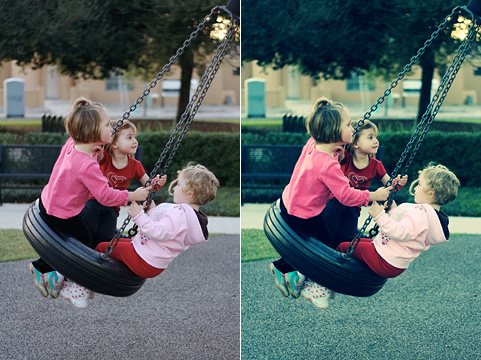
The Finished Product
Now your retro cross-processed masterpiece is complete, and you have a preset saved within Aperture to easily reuse the effect on any image you like. Here’s a comparison of the final images from Aperture and Photoshop after the color toning and vignetting are applied: