Click or tap a topic below. For additional help read the frequently asked questions.
Main screen
Adding lists
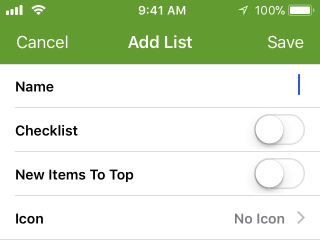
At the top of the main screen, tap the “add list” button to begin adding a new list:
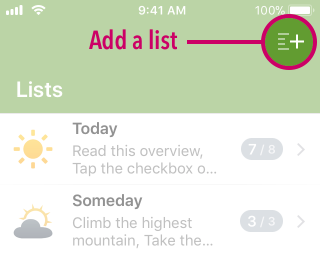
On the “Add List” screen type in a name for your list, decide whether or not it should be a checklist, and choose an icon. When finished, tap the “Save” button.
Deleting lists
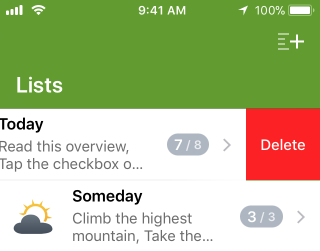
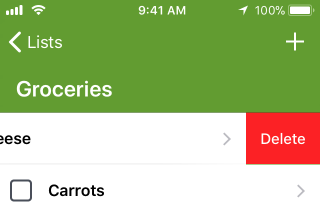
Swipe left on the list or item you want to delete, then tap the “Delete” button:
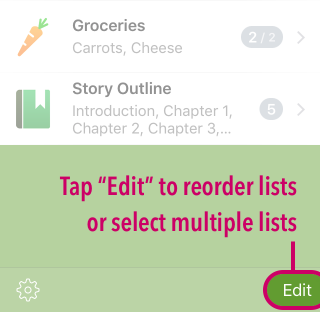
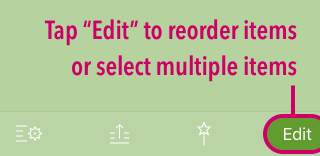
You can also delete multiple lists at once. Start by tapping the “Edit” button:
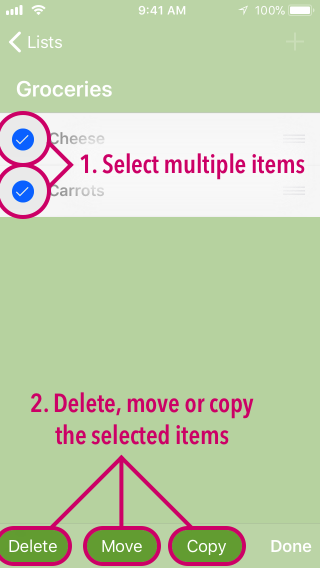
… then select the lists to delete, and tap “Delete”:
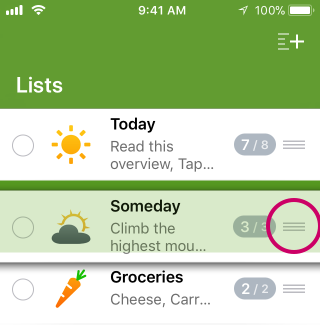
Reordering lists
To change the order that lists appear on the main screen, tap the “Edit” button:
… then place your finger on the drag control to the right of a list, and drag the list up/down:
Merging lists
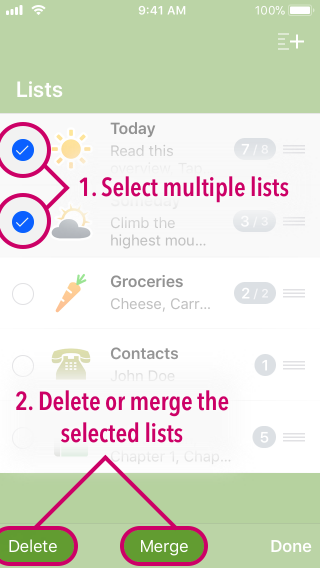
To merge multiple lists into one, start by entering “multiple selection” mode:
… then select the lists you want to merge (note that all lists will be merged into the first list you select), and tap “Merge”:
List screen
Adding list items
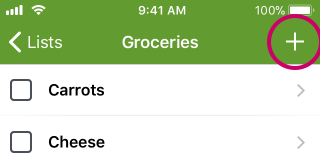
While viewing a list, tap the “+” button to begin adding an item to the list:
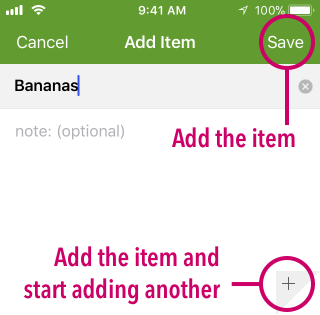
On the “Add Item” screen, enter the text for the item name (and optional note). When finished, tap “Save” – or tap the “+” button in the lower right corner to quickly start adding another item.
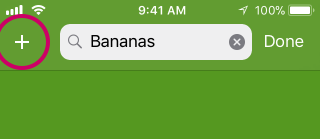
While searching a list, if the item you’re searching for doesn’t exist yet, you can quickly add it by tapping the “+” button next to the search bar.
Deleting list items
Swipe left on the item you want to delete, then tap the “Delete” button:
You can also delete multiple items at once. Start by entering “multiple selection” mode:
… then select the items to delete, and tap “Delete”:
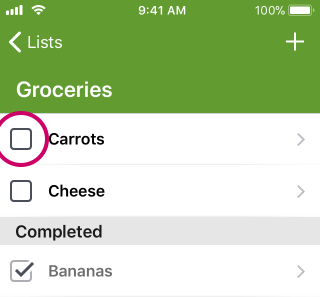
Marking items complete (or incomplete)
When viewing a checklist, tap on an item’s checkbox to mark it as complete.
If the item is already completed, tapping on the checkbox will mark it incomplete.
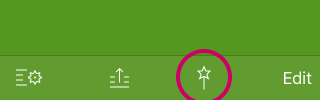
You can also quickly mark all items in a list as complete or incomplete. Start by tap the quick actions button:
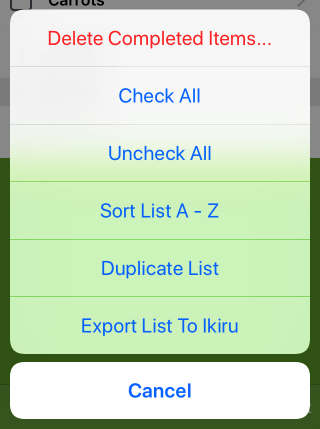
… then tap “Check All” or “Uncheck All”:
Changing a list's name or icon
While viewing a list, tap on the list settings button to change the list name or icon.

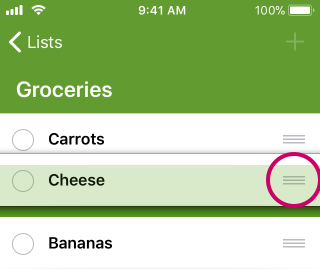
Reordering/sorting items in a list
To change the order that items appear within a list, tap the “Edit” button:
… then place your finger on the drag control to the right of an item, and drag the item up/down:
To quickly sort a list alphabetically, tap the quick actions button:
… then tap “Sort List A – Z”:
Searching a list
Scroll to the top of a list and tap “Search list”, then type what you want to search for. If the phrase you searched for isn’t already in the list, tap “+” next to the search bar to add it:
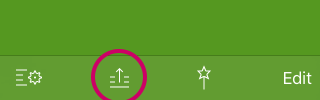
Quick actions
Tap the quick actions button to bring up a menu of actions you can perform on the list:
Actions are included for quickly deleting all completed items, checking or unchecking all items, sorting the list alphabetically, duplicating the list, and exporting the list to the newer list app “Ikiru”:
Moving list items
You can move an individual list item by viewing that item and tapping the move button:
You can also move multiple items at once while viewing a list. Start by tapping the “Edit” button:
… then select the items to move, and tap “Move”:
Copying list items
You can copy an individual list item by viewing that item and tapping the copy button:
You can also copy multiple items at once while viewing a list. Start by tapping the “Edit” button:
… then select the items to copy, and tap “Copy”:
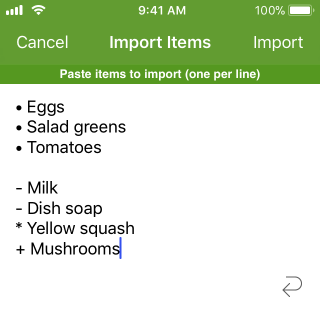
Importing items
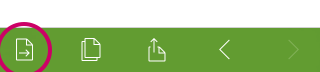
You can paste in list items from another application or from an email that you’ve typed on your computer. Once you’ve copied the items, open Paperless and view the list that you want to import the items into – then tap the add item button:
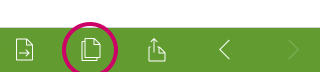
Next tap the flip icon to show “Import Items…”:

Then tap in the blank text area and choose “Paste”:
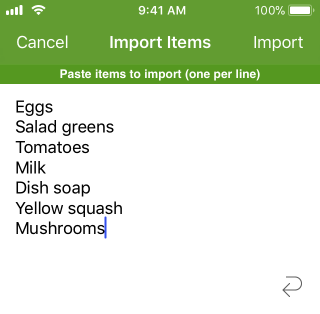
The import feature tries to be smart and strips out any extra spaces, tabs and carriage returns so that you don’t have to. Even if your pasted in text looks like this, it will import fine:
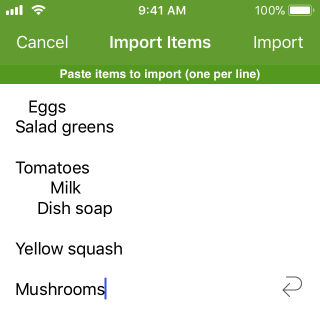
It also strips out leading bullets, dashes, plus signs, asterisks, underscores and periods. This will import fine as well:
Sharing a list
To send a list via email or text message, or to copy a plain text version of the list, tap the “share” button:
When you share a list via email it will include a link to “Import this list to Paperless”. If another Paperless user receives the email, and taps that link (or either of the Paperless icons within the email), the list is imported directly into their copy of Paperless. The imported list is a separate copy, and will not be synced between your device and theirs.
Printing a list
To print a list tap the “share list” button, then tap “Print”:
List item screen
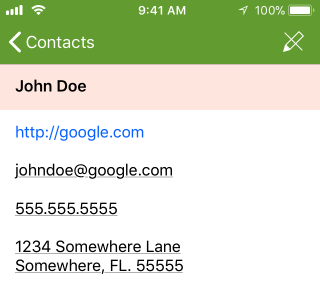
Viewing and editing a list item
To view an item simply tap on it in the list.
Each item has a name and an optional note. One nice feature here is that the name and note areas expand as needed, so you can make the item name as long as you want.
The screen also has two modes: “Editable” and “Read Only/Detect Links”. You can switch modes by tapping the pencil icon in the upper right corner of the screen.
In “Editable” mode, you can tap either the item name or item note to edit them.
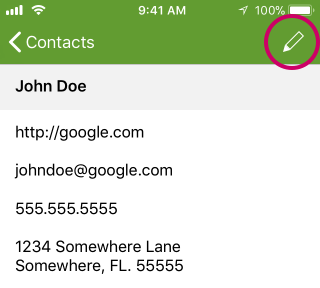
In “Read Only/Detect Links” mode, you can’t edit the item name or note. Instead, links are detected for phone numbers, email addresses, URLs and street addresses. Links are detected in both the item name and note – so feel free to put them in either.
You can tap a link to perform various actions – like calling a phone number or sending an email. Tapping and holding your finger on a link may allow you to perform additional actions.
Moving a list item
You can move an individual list item by viewing that item and tapping the move button:
You can also move multiple items at once while viewing a list. Start by tapping the “Edit” button:
… then select the items to move, and tap “Move”:
Copying a list item
You can copy an individual list item by viewing that item and tapping the copy button:
You can also copy multiple items at once while viewing a list. Start by tapping the “Edit” button:
… then select the items to copy, and tap “Copy”:
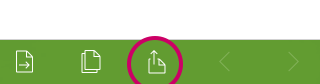
Sharing a list item
To send a list item via email or text message, or to copy a plain text version of the item, tap the “share item” button:
Printing a list item
To print a list item tap the “share item” button, then tap “Print”:
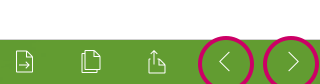
Showing the previous/next item
When viewing a list item, tap the previous/next buttons at the bottom of the screen to show the previous/next item:
Settings
Setting the app icon number badge
If you’d like a quick way to keep track of how many things you need to do, you can display a number badge on the Paperless app icon.
![]()
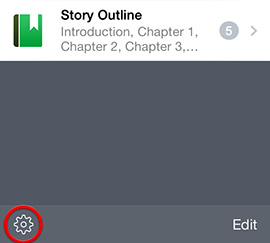
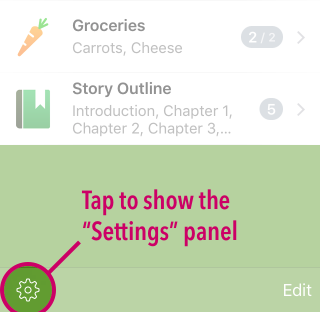
To turn this feature on, tap the app settings icon on the main screen:
Next tap “Number Badge”:
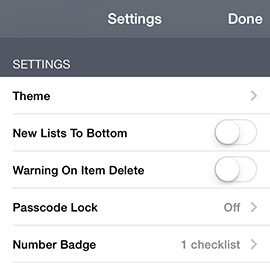
From there you can select any checklists you want to be included in the number badge count. Note that only items that have NOT been completed are included in the count.
![]()
The checklist(s) you choose here will also be marked with a red item count badge – or, a green item count badge if all items have been completed – rather than the grey item count badge that lists normally have:
![]()
Note that you can turn off the grey item count badges in “Settings > Main Screen”, but the red/green badges are still displayed regardless of that setting.
Backup
Backing up and syncing lists between devices via Dropbox
Paperless has an “Automatic Backup And Syncing” feature you can use to sync lists between multiple iPhones and iPads. It works by storing a copy of your lists on a free Dropbox account.
It is highly recommended that you use this feature. It stores your lists securely on Dropbox, and makes upgrading to a new iPhone or iPad and transferring your lists very easy. It also helps if you accidentally delete the app (it happens!) since you can just re-download the app and connect it to Dropbox again to recover your lists.
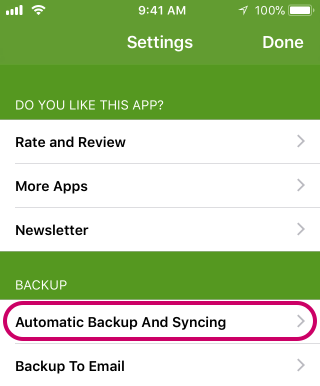
To enable the “Automatic Backup And Syncing” feature, tap to show the Settings panel:
… then tap “Automatic Backup And Syncing”:
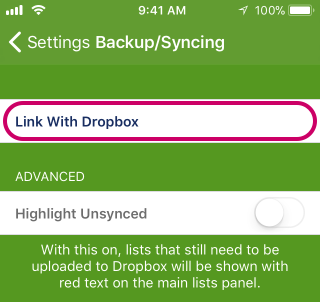
… and then tap “Link With Dropbox” and connect it to your Dropbox account:
Restoring a list that was accidentally deleted
If you previously enabled the “Automatic Backup And Syncing” feature, you may be able to recover a list that was accidentally deleted since Dropbox saves deleted files for 30 days.
To recover a list:
- on your computer, go to the Dropbox website and log in to your account: https://www.dropbox.com/home
- click “Show deleted files” on the right side of the page
- in the list of files, click on the folder named “Apps” to open it
- click on the folder named “Paperless” to open it
Inside the “Paperless” folder, you should see a file ending in “.xml” for each of the lists you had in Paperless.
- to restore one of the list files that is marked as “Deleted”, simply click on the file name, and then click the blue “Restore” button
- open the Paperless app and the list should be imported
Dropbox’s own instructions on recovering deleted files may be helpful as well.
Restoring a previous version of a list
If you previously enabled the “Automatic Backup And Syncing” feature, you may be able to recover an earlier version of the list by reverting to an earlier version of it on the Dropbox website:
- on your computer, go to the Dropbox website and log in to your account: https://www.dropbox.com/home
- click the “Files” button on the left side
- click on the folder named “Apps”
- click on the folder named “Paperless”
- inside that folder, you should see a bunch of files ending in “.xml”… one for each of the lists you have in Paperless
- find the file for the list that you want to recover, and click on the the “…” button next to it
- click “Version history”
- now comes the tricky part… you should see the file listed a few times by the date it was modified You’ll need to figure out which version of the list is the one that has all of your information. You can do that by clicking on the file name (like “Today.xml”) to view that version of the list.
The list will be shown as raw XML code which can be difficult to read. To make it easier to read, you can click the “Download” button in the upper right corner of the screen, then open the file that you downloaded in a web browser. It will be displayed as a nicely formatted list, without all of the raw XML code.
- once you’ve found the version of the list that you want, click the “Restore” button next to it
Now, when you open Paperless again, the list should reload to the version you just restored.
Dropbox’s own instructions on restoring previous versions of files may be helpful as well.
Backing up lists via email
You can back up your lists via email in a format that you can later restore to Paperless.
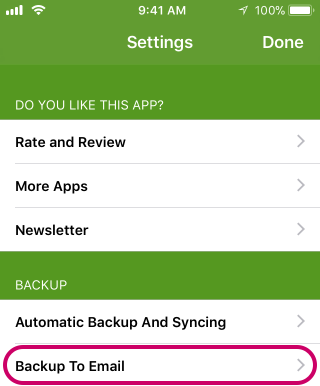
To create a backup, go to the app settings screen…
… and tap the “Backup To Email” button.
Important: send the backup email to an email address you can check directly on your iPhone/iPad in the Mail app. Other iOS email apps won’t work… you must use Apple’s “Mail” app. Also, forwarding the email through another program like Microsoft Outlook can mess up the backup.
To restore lists from an email backup, open the previously sent backup email in the “Mail” app on your iOS device, then either tap the link to “Restore All Lists”, or tap on the name of an individual list to restore just that list.